標籤:WSL

掛載 WSL2 的目錄到 Podman 中

TL;DR

cat <<-EOF | sudo tee /etc/systemd/system/mnt-wsl-instances-${WSL_DISTRO_NAME}.mount
[Unit]
Description=WSL Instances

[Mount]
What=/
Where=/mnt/wsl/instances/${WSL_DISTRO_NAME}
Type=none
Options=defaults,bind,X-mount.mkdir

[Install]
WantedBy=multi-user.target
EOF
sudo systemctl daemon-reload
sudo systemctl enable --now mnt-wsl-instances-${WSL_DISTRO_NAME}.mount
podman-remote run \
  -v /mnt/wsl/instances/${WSL_DISTRO_NAME}/`pwd`:/app \
  docker.io/library/busybox ls /app

前情提要

Podman[1] 是一個由 Redhat[2] 主推的 Container[3] 工具,如果有用過容器的讀者們應該對於與其類似的 Docker[4] 不陌生,Podman 就是一個這樣的容器管理工具。

與 Docker 不同的是,Podman 另外引入了 Pod[5] 的概念,以及具有預設支援 rootless 及去 daemon 化等特色。

Podman Desktop

Podman 團隊在各平臺上推出了桌面管理工具 —— Podman Desktop[6],類似於 Docker Desktop 提供視覺化的管理功能外,也能協助使用者安裝 Podman 至系統中並提供各種設定及擴充功能。

有興趣從 Docker 跳船的讀者可以參考 Podman Desktop 提供的跳船指南: https://podman-desktop.io/docs/migrating-from-docker

Windows 下的 Podman

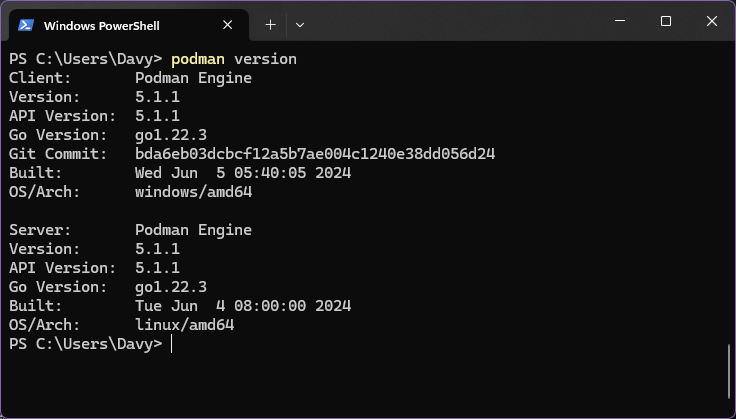
在 Windows 上,Podman 會在 Windows 中安裝 podman.exe,協助你在 Host 的 Command line 中輕鬆存取 Podman,例如我們可以打開一個 PowerShell(或 CMD),執行 podman version,即可看到類似下方截圖的結果:
podman-on-windows.png

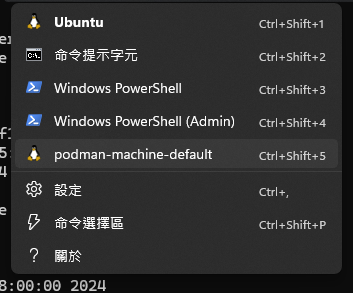
大家可以注意到,雖然我們可以在 Windows 下面執行 Podman 指令,但實際上的 Podman Engine 卻是執行在 Linux 上的,這是因為 Podman 目前只能管理 Linux Container,因此 Podman 決定將 Podman Engine 跑在 WSL2 中,如果有安裝 Windows Terminal 的話,可以從自動產生的下拉選單中發現一個新的 WSL2 的 Distro。
podman-machine-default.png

並且 Podman 會幫你做好與 Windows Host 的整合,例如可以直接掛載 Windows 的目錄或檔案進容器中,例如:

PS C:\Users\Davy\podman-test> echo "Hi Podman from Windows" > hello.txt
PS C:\Users\Davy\podman-test> podman run --rm -v .\hello.txt:/hello.txt docker.io/library/busybox cat /hello.txt
Trying to pull docker.io/library/busybox:latest...
Getting image source signatures
Copying blob sha256:ec562eabd705d25bfea8c8d79e4610775e375524af00552fe871d3338261563c
Copying config sha256:65ad0d468eb1c558bf7f4e64e790f586e9eda649ee9f130cd0e835b292bbc5ac
Writing manifest to image destination
��Hi Podman from Windows
PS C:\Users\Davy\podman-test>

(請忽略那兩個看不見的 BOM 符號……)

也就是說,我們可以隨意地編寫 PowerShell 腳本(或 CMD 批次檔)來操作 Podman!😏

WSL2 下的 Podman

那麼,通常會使用 Podman 的話,應該會對 WSL2[7] 也不陌生吧!

於是,我們可能會想,既然 Windows Host 都能如此順暢地與 WSL2 中的 Podman 整合了,那麼原本就在 WSL2 的其他 Distro 應該可以更好地整合吧……嗎?

很可惜,Podman Desktop 只丟了一個頁面[8]告訴你,你要自己整合。

整合方式大致就是在 WSL2 中安裝一個 Podman,並將 podman-machine-default 提供的 Podman socket 接上這個 Podman,方法如下:

安裝 Podman / Podman Remote

Podman Desktop 推薦安裝 podman-remote[9] 作為你在 WSL2 中使用的 Podman CLI,安裝方式也很簡單,到 containers/podman 的 Release 頁面中下載適合的 podman-remote 執行檔後放入 $PATH(例如 /usr/local/bin/usr/bin) 中,並將 podman alias 成 podman-remote 或直接 ln -s podman-remote podman

接下來就可以嘗試在 WSL2 中執行看看 podman(或 podman-remote)了!

$ podman-remote ps
Cannot connect to Podman. Please verify your connection to the Linux system using `podman system connection list`, or try `podman machine init` and `podman machine start` to manage a new Linux VM
Error: unable to connect to Podman socket: Get "http://d/v5.1.2/libpod/_ping": dial unix /mnt/wsl/podman/podman-machine-default.socket: connect: connection refused

咦?為什麼不會動呢? 啊,原來是忘記將 podman-remotepodman-machine-default 中的 Podman 連結在一起了,還需要下面的設定才行:

$ podman-remote system connection add --default \
  podman-machine-default-root \
  unix:///mnt/wsl/podman-sockets/podman-machine-default/podman-root.sock
# usermod --append --groups 10 $(whoami)

設定完成之後重新登入 Shell(或重新打開一個新的 Terminal),再執行一次 podman-remote 看看:

$ podman-remote ps
CONTAINER ID  IMAGE       COMMAND     CREATED     STATUS      PORTS       NAMES
$ podman-remote run --rm quay.io/podman/hello
Trying to pull quay.io/podman/hello:latest...
Getting image source signatures
Copying blob sha256:81df7ff16254ed9756e27c8de9ceb02a9568228fccadbf080f41cc5eb5118a44
Copying config sha256:5dd467fce50b56951185da365b5feee75409968cbab5767b9b59e325fb2ecbc0
Writing manifest to image destination
!... Hello Podman World ...!

         .--"--.
       / -     - \
      / (O)   (O) \
   ~~~| -=(,Y,)=- |
    .---. /`  \   |~~
 ~/  o  o \~~~~.----. ~~
  | =(X)= |~  / (O (O) \
   ~~~~~~~  ~| =(Y_)=-  |
  ~~~~    ~~~|   U      |~~

Project:   https://github.com/containers/podman
Website:   https://podman.io
Desktop:   https://podman-desktop.io
Documents: https://docs.podman.io
YouTube:   https://youtube.com/@Podman
X/Twitter: @Podman_io
Mastodon:  @[email protected]
$

如此一來就可以在 WSL2 中操作與 Windows 摸到的同一個 Podman 了!

掛載 WSL2 中的路徑至 Podman

就算按照步驟將 WSL2 與 Podman 整合起來之後,你還會發現一些小小小問題 —— 例如掛載不到 WSL2 中的目錄……

~/podman-example$ echo "Hello from WSL2" > hello.txt
~/podman-example$ cat `pwd`/hello.txt
Hello from WSL2
~/podman-example$ podman-remote run --rm \
  -v `pwd`/hello.txt:/hello.txt \
  docker.io/library/busybox \
  cat /hello.txt
Error: statfs /home/davy/podman-example/hello.txt: no such file or directory
~/podman-example$

咦? 奇怪? 為什麼他會跟我說這個測試用的檔案不存在,明明直接 cat 會動的呀……

而且在 Docker 裡面如果這樣子做的話是會動的,為什麼在 Podman 中不行呢?

原來是在 Docker Desktop 中,對於掛載 WSL2 Distro 中的路徑時,Docker 會轉而向一個輔助工具求助,這個工具會協助 Docker 存取其他 WSL2 中的資料[10]。因為 WSL2 中各個 Distro 的資料是各自獨立的,所以 Docker/Podman 的 WSL2 預設沒有辦法直接存取其他 Distro 的資料,此時會導致掛載路徑時會只能在自己的 WSL2 中搜尋,我們可以來做個實驗:

我們嘗試將 /home 掛載到 Podman container 中,在此之前我們先來確認在兩個 WSL2 中的檔案狀態:

user@podman-machine-default:~ $ ls /home/
user

davy@Ubuntu:~ $ ls /home/
davy

接下來我們開始嘗試掛載:

davy@Ubuntu:~ $ podman-remote run --rm -v /home/:/the-home docker.io/library/busybox ls /the-home
user
davy@Ubuntu:~ $

可以看到,podman-remotepodman-machine-default 中的 /home 掛載到了容器中,而非我們期望的 WSL2 Distro 中的 /home

也就是說,--volume/-v 參數,不論在那個 WSL2 Distro,對應到的都是 podman-machine-default 中的路徑。

那麼,我們該如何掛載 WSL2 中其他 Distro 的路徑呢?

WSL2 的神奇共用目錄

在 WSL2 中,有一個神祕的路徑是全 WSL2 Distro 共享的,那就是 /mnt/wsl,Podman 也是藉由將 Podman Engine 的 socket 放在這個地方來讓其他 Distro 可以存取[11]。WSL2 將這個神奇目錄用在存放與全 Distro 共享的設定等資料,大家可以嘗試下面的指令:

$ ls -l /etc/resolv.conf
lrwxrwxrwx 1 root root 20 Jul 17 22:11 /etc/resolv.conf -> /mnt/wsl/resolv.conf
$ ls -l /mnt/wsl/resolv.conf
-rw-r--r-- 1 root root 213 Jul 13 09:12 /mnt/wsl/resolv.conf
$ cat /mnt/wsl/resolv.conf
# This file was automatically generated by WSL. To stop automatic generation of this file, add the following entry to /etc/wsl.conf:
# [network]
# generateResolvConf = false
nameserver 10.255.255.254
search local
$

可以看到其實所有 Distro 的 /etc/resolv.conf[12],都是指向 /mnt/wsl/resolv.conf,而這個檔案會被 WSL2 自動地更新,WSL2 藉由這個方式來讓所有的 Distro 共用相同的設定。

於是,我們可以透過這個神奇的小地方來把我們要分享的東西放在這裡,再讓 podman-machine-default 來這裡存取即可!

解決方案

既然知道了方法,那麼我們就往下來執行,最簡單的方式就是利用 mount 指令將 WSL2 各個 Distro 的根目錄分享到 /mnt/wsl 下面,如此一來 podman-machine-default 就可以存取到裡面的內容了![13]

$ echo $WSL_DISTRO_NAME
Ubuntu
# mount -t bind -o defaults,bind,X-mount.mkdir / /mnt/wsl/instances/${WSL_DISTRO_NAME}
$ ls /mnt/wsl/instances/
Ubuntu
$ ls /mnt/wsl/instances/Ubuntu/home/
davy
$ podman-remote run --rm \
  -v /mnt/wsl/instances/${WSL_DISTRO_NAME}`pwd`/hello.txt:/hello.txt \
  docker.io/library/busybox \
  cat /hello.txt
Hello from WSL2
$

終於成功啦!🎉

systemd.mount

目前主流版本的 WSL2 引擎都已經支援 systemd[14][15] 了,於是我們可以再多做一點事情 —— 自動掛載。

由於前面我們是手動使用 mount 指令來進行掛載,在每次 WSL2 重新啓動的時候都會復原,因此我們希望在 WSL2 啓動的時候就幫我們把這個 mountpoint 掛載上去,我們可以透過 systemd.mount 來幫我們完成這個任務。

/etc/systemd/system/ 下建立一個新的檔案 mnt-wsl-instances-${WSL_DISTRO_NAME}.mount,內容如下(此例中以 Ubuntu 取代 ${WSL_DISTRO_NAME},請讀者自行依照自己的環境作更換):

[Unit]
Description=WSL Instances

[Mount]
What=/
Where=/mnt/wsl/instances/${WSL_DISTRO_NAME}
Type=none
Options=defaults,bind,X-mount.mkdir

[Install]
WantedBy=multi-user.target

接下來執行下列指令來啓用這個 mount:

# umount /mnt/wsl/instances/${WSL_DISTRO_NAME}
$ ls /mnt/wsl/instances/${WSL_DISTRO_NAME}

# systemctl daemon-reload
# systemctl enable --now mnt-wsl-instances-${WSL_DISTRO_NAME}.mount
Created symlink /etc/systemd/system/multi-user.target.wants/mnt-wsl-instances-Ubuntu.mount → /etc/systemd/system/mnt-wsl-instances-Ubuntu.mount.
$ ls /mnt/wsl/instances/Ubuntu/home/
davy
$

這次終於是大功告成了!🎊

結語

其實原本不是要寫 Podman 相關的內容的…… 但剛好遇到要使用 Podman 的情景就想說順便把這件事情寫下來好了,原本是打算之後再跟大家分享的,現在提前先分享給大家 :)

Podman 在環境整合這方面真的還沒有做的 Docker 好,但還算在能搞懂原理的情況下自行 Hack,使用上或許沒有這麼方便,不過我個人還是覺得 Podman 還算是好用且方便的。


  1. 詳見官方網站: https://podman.io/ ↩︎

  2. 亦稱紅帽,主力開發及維護開源生態的軟體公司,其發行的 Redhat Enterprise Linux 常用於各種生產環境,詳見其官方網站: https://www.redhat.com/ ↩︎

  3. 此處專指 Linux Container,可參見維基百科《Containerization》條目 ↩︎

  4. 容器管理工具,詳見其官方網站: https://www.docker.com/ ↩︎

  5. 先出現與 Kubernetes 中的概念,為一組運算資源的最小管理單位,包含網路、掛載點等,詳見 K8s 的概念說明 ↩︎

  6. Podman 的桌面管理工具,詳見官方網站: https://podman-desktop.io/ ↩︎

  7. Windows Subsystem Linux 2,一個深度整合 Linux 執行環境於 Windows 中的解決方案,設計說明請參閱: https://learn.microsoft.com/en-us/windows/wsl/compare-versions#whats-new-in-wsl-2 ↩︎

  8. 請見: https://podman-desktop.io/docs/podman/accessing-podman-from-another-wsl-instance ↩︎

  9. 僅有遠端操作 Podman Engine 功能的閹割版 Podman CLI,使用說明詳見: https://docs.podman.io/en/latest/markdown/podman-remote.1.html ↩︎

  10. 原文節錄 "To make bind-mounts a seamless experience, we introduced a docker api proxy similar to the one we use for enabling bind mounts of Windows files that translates paths relative to the user distro into a path to the same file accessible from the LinuxKit container.",全文請見 https://www.docker.com/blog/new-docker-desktop-wsl2-backend/ ↩︎

  11. Podman 將 socket 放在 /mnt/wsl/podm an-sockets/podman-machine-default/podman-root.sock 來與其他 Distro 共用 ↩︎

  12. Linux 中用來設定 DNS 資訊的設定檔,詳見 man 5 resolv.conf 或這裡的存檔: https://man7.org/linux/man-pages/man5/resolv.conf.5.html ↩︎

  13. $WSL_DISTRO_NAME —— 此一環境變數會記錄當下環境的 WSL2 Distro 名稱 ↩︎

  14. 在 WSL v0.67.6+ 中可以啓用 systemd,詳見官方部落格: https://devblogs.microsoft.com/commandline/systemd-support-is-now-available-in-wsl/ ↩︎

  15. "systemd is a suite of basic building blocks for a Linux system. It provides a system and service manager that runs as PID 1 and starts the rest of the system.",節錄自官方網站: https://systemd.io/ ↩︎

在 WSL2 中使用 Ubuntu 桌面環境

雖然微軟在 BUILD 2020 上已經宣佈,未來會讓 WSL2 可以執行 GUI 應用程式[1],但不知道什麼時候才會正式支援這個功能,對於想體驗看看效果到底如何的我呢,就打算先在 Windows 端啓動一個 X Window Server 來嚐鮮看看。

事前準備

首先,對於一個習慣 Ubuntu 的我來說,如果可以體驗到完整的 Ubuntu 桌面是再好不過了,換句話說,我們需要在上面可以跑一個完整的 Gnome Shell 環境,並加上 Ubuntu 的 Extension 們。

取得完整 systemd 環境

Gnome Shell 從 3.34 版開始,就已經跟 systemd 整合[2]了,也就是說,我們必須要先有一個完整的 systemd 環境才能順利的執行 Gnome Shell。由於 WSL2 的實作機制其實是啓動一個 Tiny Linux VM,然後利用 Linux Namespace 機制來執行並隔離各個發行版,並且由微軟實作了一個 init (PID 1) 來辦到快速啓動以及作為與 windows 溝通的橋樑[3]

也因此,在 WSL2 的系統裡面,其實是沒有啓用 systemd 的,我們可以簡單的透過下面的方式來檢查看看:

$ systemctl
System has not been booted with systemd as init system (PID 1). Can't operate.
Failed to connect to bus: Host is down
$ ps u -q 1
USER         PID %CPU %MEM    VSZ   RSS TTY      STAT START   TIME COMMAND
root           1  0.0  0.0    908   592 ?        Sl   10:31   0:00 /init

可以很明顯的看到,當我們執行 systemctl 的時候,會顯示出我們的 init system (PID 1) 並非 systemd,而是微軟提供的 /init

那我們如果想要擁有一個 systemd 環境的話,該怎麼辦呢?

由於 systemd 必須以 PID 1 的方式執行,所以直接執行 systemd 是沒有用的,但多虧了 Linux Namespace 我們可以在 WSL2 中建立新的 Namespace 並把 systemd 作為 PID 1 來執行,也就是在 WSL2 中再多加一層 PID Namespace,使得我們可以建築一個 systemd 的環境並跳進這個新的 Namespace 中。

所幸,我們不需要自己來研究這部分該如何操作,GitHub 上已經有幾個專案可以直接拿來參考並使用:

我們下面會使用 DamionGans/ubuntu-wsl2-systemd-script 來當作範例,只要按照說明操作就可以了:

$ git clone https://github.com/DamionGans/ubuntu-wsl2-systemd-script.git
Cloning into 'ubuntu-wsl2-systemd-script'...
remote: Enumerating objects: 76, done.
remote: Counting objects: 100% (76/76), done.
remote: Compressing objects: 100% (55/55), done.
remote: Total 76 (delta 40), reused 41 (delta 21), pack-reused 0
Unpacking objects: 100% (76/76), 19.46 KiB | 996.00 KiB/s, done.
$ cd ubuntu-wsl2-systemd-script/
ubuntu-wsl2-systemd-script $ bash ubuntu-wsl2-systemd-script.sh
[sudo] password for davy:
Hit:1 http://security.ubuntu.com/ubuntu focal-security InRelease
Hit:2 http://archive.ubuntu.com/ubuntu focal InRelease
Hit:3 http://archive.ubuntu.com/ubuntu focal-updates InRelease
Hit:4 http://archive.ubuntu.com/ubuntu focal-backports InRelease
Reading package lists... Done
(Reading database ... 31836 files and directories currently installed.)
Preparing to unpack .../0-dbus-user-session_1.12.16-2ubuntu2.1_amd64.deb ...
Unpacking dbus-user-session (1.12.16-2ubuntu2.1) over (1.12.16-2ubuntu2) ...
Preparing to unpack .../1-dbus-x11_1.12.16-2ubuntu2.1_amd64.deb ...
Unpacking dbus-x11 (1.12.16-2ubuntu2.1) over (1.12.16-2ubuntu2) ...
Preparing to unpack .../2-dbus_1.12.16-2ubuntu2.1_amd64.deb ...
Unpacking dbus (1.12.16-2ubuntu2.1) over (1.12.16-2ubuntu2) ...
Preparing to unpack .../3-libdbus-1-3_1.12.16-2ubuntu2.1_amd64.deb ...
Unpacking libdbus-1-3:amd64 (1.12.16-2ubuntu2.1) over (1.12.16-2ubuntu2) ...
Selecting previously unselected package daemonize.
Preparing to unpack .../4-daemonize_1.7.8-1_amd64.deb ...
Unpacking daemonize (1.7.8-1) ...
Selecting previously unselected package fontconfig.
Preparing to unpack .../5-fontconfig_2.13.1-2ubuntu3_amd64.deb ...
Unpacking fontconfig (2.13.1-2ubuntu3) ...
Setting up fontconfig (2.13.1-2ubuntu3) ...
Regenerating fonts cache... done.
Setting up libdbus-1-3:amd64 (1.12.16-2ubuntu2.1) ...
Setting up dbus (1.12.16-2ubuntu2.1) ...
Setting up daemonize (1.7.8-1) ...
Setting up dbus-x11 (1.12.16-2ubuntu2.1) ...
Setting up dbus-user-session (1.12.16-2ubuntu2.1) ...
Processing triggers for systemd (245.4-4ubuntu3) ...
Processing triggers for man-db (2.9.1-1) ...
Processing triggers for libc-bin (2.31-0ubuntu9) ...
rm: cannot remove '/lib/systemd/system/sysinit.target.wants/proc-sys-fs-binfmt_misc.mount': No such file or directory
'\\wsl$\Ubuntu-20.04\home\davy\ubuntu-wsl2-systemd-script'
是目前用來啟動 CMD.EXE 的目錄路徑。不支援 UNC 路徑。
預設目錄是 Windows 目錄。

成功: 已經儲存指定的值。
'\\wsl$\Ubuntu-20.04\home\davy\ubuntu-wsl2-systemd-script'
是目前用來啟動 CMD.EXE 的目錄路徑。不支援 UNC 路徑。
預設目錄是 Windows 目錄。

成功: 已經儲存指定的值。
ubuntu-wsl2-systemd-script $

安裝完畢後我們需要重啓整個 WSL2,假定我們的 WSL 名稱是 ubuntu-20.04,在命令提示字元(CMD)中執行下列指令以關閉 WSL2:

> wsl.exe -t ubuntu-20.04

接者使用一般使用者啓動 WSL2,就可以發現有不一樣的地方了(多了一個啓動 systemd 的提示),透過檢查 PID 1 也可以發現整個環境已經是由 systemd 掌握了:

Sleeping for 1 second to let systemd settle
Welcome to Ubuntu 20.04 LTS (GNU/Linux 4.19.104-microsoft-standard x86_64)

$ ps u -q 1
USER         PID %CPU %MEM    VSZ   RSS TTY      STAT START   TIME COMMAND
root           1  2.8  0.0 175224 12920 ?        Ss   21:48   0:06 /lib/systemd/systemd --system-unit=basic.target
$

移除用不到的 snap(可選)

由於 Ubuntu 安裝 systemd 時,會連 snap 也一併啓用,如果大家用不到的話可以把 snap 從系統中移除,這麼一來也可以提升啓動速度,我們可以看到系統啓動時也連著一些 snap 的元件一起啓動了(而且還不少 Processes):

$ ps aux
USER         PID %CPU %MEM    VSZ   RSS TTY      STAT START   TIME COMMAND
root           1  1.3  0.0 108788 11360 ?        Ss   22:03   0:00 /lib/systemd/systemd --system-unit=basic.targ
root          43  2.1  0.1  45248 14600 ?        S<s  22:03   0:00 /lib/systemd/systemd-journald
root          61  0.4  0.0  21592  8496 ?        Ss   22:03   0:00 /lib/systemd/systemd-udevd
systemd+      63  1.2  0.0  18548  7896 ?        Ss   22:03   0:00 /lib/systemd/systemd-networkd
root         152  0.0  0.0  10572  4588 pts/0    S    22:03   0:00 /bin/login -p -f      'HOSTTYPE=x86_64' 'PWD=
root         219  1.2  0.0   3608  1792 ?        Ss   22:03   0:00 snapfuse /var/lib/snapd/snaps/core18_1705.sna
root         220  0.3  0.0   3660  1476 ?        Ss   22:03   0:00 snapfuse /var/lib/snapd/snaps/lxd_14804.snap
root         221  0.1  0.0   3488  1536 ?        Ss   22:03   0:00 snapfuse /var/lib/snapd/snaps/snapd_7264.snap
systemd+     228  1.1  0.0  24116 12592 ?        Ss   22:03   0:00 /lib/systemd/systemd-resolved
root         231  0.1  0.0 241020  9280 ?        Ssl  22:03   0:00 /usr/lib/accountsservice/accounts-daemon
message+     232  0.2  0.0   7428  4640 ?        Ss   22:03   0:00 /usr/bin/dbus-daemon --system --address=syste
root         235  0.3  0.1  29216 17788 ?        Ss   22:03   0:00 /usr/bin/python3 /usr/bin/networkd-dispatcher
syslog       236  0.1  0.0 224328  4296 ?        Ssl  22:03   0:00 /usr/sbin/rsyslogd -n -iNONE
root         238  2.1  0.2 1457156 35432 ?       Ssl  22:03   0:00 /usr/lib/snapd/snapd
root         240  1.1  0.0  16852  7728 ?        Ss   22:03   0:00 /lib/systemd/systemd-logind
root         261  0.0  0.0 236408  9084 ?        Ssl  22:03   0:00 /usr/lib/policykit-1/polkitd --no-debug
root         302  0.0  0.0   8540  2764 ?        Ss   22:03   0:00 /usr/sbin/cron -f
root         307  0.4  0.1 108036 20512 ?        Ssl  22:03   0:00 /usr/bin/python3 /usr/share/unattended-upgrad
daemon       308  0.0  0.0   3796  2200 ?        Ss   22:03   0:00 /usr/sbin/atd -f
root         318  0.0  0.0   7356  2172 tty1     Ss+  22:03   0:00 /sbin/agetty -o -p -- \u --noclear --keep-bau
root         326  0.0  0.0   5832  1744 ?        Ss   22:03   0:00 /sbin/agetty -o -p -- \u --noclear tty1 linux
davy         376  0.2  0.0  18444  9612 ?        Ss   22:03   0:00 /lib/systemd/systemd --user
davy         377  0.0  0.0 110132  3188 ?        S    22:03   0:00 (sd-pam)
davy         387  0.2  0.0  10048  4992 pts/0    S    22:03   0:00 -bash
davy         431  0.0  0.0  10604  3224 pts/0    R+   22:04   0:00 ps aux
$

首先我們先將所有 snap 都列出後,一個一個移除:

$ snap list
Name    Version   Rev    Tracking         Publisher   Notes
core18  20200311  1705   latest/stable    canonical✓  base
lxd     4.0.1     14804  latest/stable/…  canonical✓  -
snapd   2.44.3    7264   latest/stable    canonical✓  snapd
# snap remove lxd
# snap remove core18
# snap remove snapd
$ snap list
No snaps are installed yet. Try 'snap install hello-world'.
# apt purge snapd
$ ps aux
USER         PID %CPU %MEM    VSZ   RSS TTY      STAT START   TIME COMMAND
root           1  0.6  0.0 109692 12692 ?        Ss   22:03   0:03 /lib/systemd/systemd --system-unit=basic.targ
root          43  0.1  0.1  53444 15456 ?        S<s  22:03   0:00 /lib/systemd/systemd-journald
root          61  0.0  0.0  21592  8496 ?        Ss   22:03   0:00 /lib/systemd/systemd-udevd
systemd+      63  0.1  0.0  18548  7896 ?        Ss   22:03   0:00 /lib/systemd/systemd-networkd
root         152  0.0  0.0  10572  4588 pts/0    S    22:03   0:00 /bin/login -p -f      'HOSTTYPE=x86_64' 'PWD=
systemd+     228  0.0  0.0  24116 12592 ?        Ss   22:03   0:00 /lib/systemd/systemd-resolved
root         231  0.0  0.0 241020  9280 ?        Ssl  22:03   0:00 /usr/lib/accountsservice/accounts-daemon
message+     232  0.0  0.0   7428  4640 ?        Ss   22:03   0:00 /usr/bin/dbus-daemon --system --address=syste
root         235  0.0  0.1  29216 17788 ?        Ss   22:03   0:00 /usr/bin/python3 /usr/bin/networkd-dispatcher
syslog       236  0.0  0.0 224328  4296 ?        Ssl  22:03   0:00 /usr/sbin/rsyslogd -n -iNONE
root         240  0.1  0.0  16852  7728 ?        Ss   22:03   0:00 /lib/systemd/systemd-logind
root         261  0.0  0.0 236408  9084 ?        Ssl  22:03   0:00 /usr/lib/policykit-1/polkitd --no-debug
root         302  0.0  0.0   8540  2764 ?        Ss   22:03   0:00 /usr/sbin/cron -f
root         307  0.0  0.1 108036 20512 ?        Ssl  22:03   0:00 /usr/bin/python3 /usr/share/unattended-upgrad
daemon       308  0.0  0.0   3796  2200 ?        Ss   22:03   0:00 /usr/sbin/atd -f
root         318  0.0  0.0   7356  2172 tty1     Ss+  22:03   0:00 /sbin/agetty -o -p -- \u --noclear --keep-bau
root         326  0.0  0.0   5832  1744 ?        Ss   22:03   0:00 /sbin/agetty -o -p -- \u --noclear tty1 linux
davy         376  0.0  0.0  18444  9708 ?        Ss   22:03   0:00 /lib/systemd/systemd --user
davy         377  0.0  0.0 110132  3188 ?        S    22:03   0:00 (sd-pam)
davy         387  0.0  0.0  10180  5252 pts/0    S    22:03   0:00 -bash
root        1168  0.0  0.1 283780 15888 ?        Ssl  22:07   0:00 /usr/lib/packagekit/packagekitd
davy        1273  0.0  0.0  10604  3316 pts/0    R+   22:11   0:00 ps aux

結束後我們就可以發現 Processes 數量減少了許多,讓我們的環境又稍微輕量了些。

在 Windows 準備 X Window Server

這邊有很多選擇,我選擇了 X410[4](付費),大家也可以選擇 VcXsrv[5] 之類的解決方案,這邊就不多贅述了,在這裡的範例中會需要將 X Window Server 開在 Windows 的 6000 port 上。

安裝 Ubuntu 桌面

接著我們就可以來安裝 Ubuntu 的預設桌面了,這裡會需要比較多的硬碟空間:

# apt install ubuntu-desktop
...
10 upgraded, 1077 newly installed, 0 to remove and 64 not upgraded.
Need to get 605 MB of archives.
After this operation, 2260 MB of additional disk space will be used.
Do you want to continue? [Y/n] y
...

安裝結束後,我們需要先取得 Windows 的 IP 位置[6],並嘗試對 X Window Server 連線看看:

$ cat /etc/resolv.conf
# This file was automatically generated by WSL. To stop automatic generation of this file, add the following entry to /etc/wsl.conf:
# [network]
# generateResolvConf = false
nameserver 172.17.160.1
$ nc -v 172.17.160.1 6000
Connection to 172.17.160.1 6000 port [tcp/x11] succeeded!
^C
$

成功連線後,我們可以撰寫一個啓動腳本,將 DISPLAY 指向 Windows 上的 X Window Server 中並且加上一些 Ubuntu 桌面的設定後執行 Gnome Shell:

$ cat - > gnome.sh <<'EOF'
#!/bin/bash
export DISPLAY=$(cat /etc/resolv.conf | grep nameserver | awk '{print $2}'):0.0;
export XDG_SESSION_TYPE="x11"
export XDG_RUNTIME_DIR=~/.cache/xdg
export XDG_SESSION_CLASS="user"
export XDG_SESSION_DESKTOP=ubuntu
export XDG_CURRENT_DESKTOP=ubuntu:GNOME
export DESKTOP_SESSION=ubuntu
export GDMSESSION=ubuntu
export GNOME_SHELL_SESSION_MODE=ubuntu

gnome-session "$@"
EOF
$ chmod +x gnome.sh
$ ./gnome.sh

Ubuntu Desktop (Gnome Shell) in WSL2

當然,如果想要在這個桌面中執行 Windows CMD 也是沒有問題的,而系統也可以正確的偵測到 Virtualization 是 WSL 呢。

Run CMD in Desktop

關閉 systemd-resolved

這裡是一個可選的項目,由於筆者在透過 /etc/resolv.conf 取得 Windows IP 時有遇到 resolv.conf 被 systemd-resolved 替換成 127.0.0.53 的問題,這邊提供一個方式將這個東西停用,操作完重啓 WSL2 即可:

# systemctl stop systemd-resolved
# systemctl disable systemd-resolved
Removed /etc/systemd/system/multi-user.target.wants/systemd-resolved.service.
Removed /etc/systemd/system/dbus-org.freedesktop.resolve1.service.

後記

由於目前的 WSL2 還沒有 GPGPU 加速,所以拿來執行 GUI 程式的話可能還是會有點 lag,微軟提出的最終方案是透過 RDP 來執行 GUI 應用程式也許會透過 RemoteApp 來將顯卡加速做在 Windows 端,但作為嚐鮮一下,目前的結果已經算是還可以的了XD


  1. 微軟在 BUILD 2020 上宣佈,將會讓 WSL2 可以執行 GUI 應用程式,並使用 Wayland 配合 RDP Protocol 來實作這個功能,詳見微軟部落格〈The Windows Subsystem for Linux BUILD 2020 Summary〉一文 ↩︎

  2. 關於 Gnome Shell 的這個變化,可以參考 Gnome Blog 的〈GNOME 3.34 is now managed using systemd〉一文。 ↩︎

  3. 對於 WSL2 的詳細架構,可以參考 BUILD 2019 的〈The new Windows subsystem for Linux architecture: a deep dive - BRK3068〉議程。 ↩︎

  4. https://x410.dev/ ↩︎

  5. https://sourceforge.net/projects/vcxsrv/ ↩︎

  6. https://docs.microsoft.com/zh-tw/windows/wsl/compare-versions#accessing-network-applications ↩︎

在 WSL2 裡面使用 GPU 加速機器學習

微軟在 Microsoft Build 2020 時曾表示,將在 WSL2 中新增支援 NVIDIA CUDA 以及 DirectML 來讓 Linux 中的機器學習應用可以無痛直接放到 WSL2 中使用。

沒想到才過一個月,微軟就在 Windows 10 Insider (20150+, WSL2 Kernel 4.19.121+) 釋出了支援 NVIDIA CUDA 以及 DirectML 的功能,目前 NVIDIA CUDA 看起來是直接跟 NVIDIA 合作並釋出驅動程式來支援在 WSL2 中的 GPU 虛擬化;而 DirectML 則是跟 NVIDIA/AMD/Intel 合作釋出驅動程式[1],並在 TensorFlow 上面實作以 DirectML 為後端的版本,並向上游提交了 Pull Request[2]

沒想到微軟動作這麼快,看來是真的有在 WSL2 上面投注很多資源想要鞏固整個生態系,對我們這些開發者來說其實也是挺好的,選擇也變多了。XD

ref: https://blogs.windows.com/windowsdeveloper/2020/06/17/gpu-accelerated-ml-training-inside-the-windows-subsystem-for-linux/
ref: https://docs.microsoft.com/zh-tw/windows/win32/direct3d12/gpu-accelerated-training


  1. 截至本文發文時間為止,NVIDIA 僅釋出了可使用 CUDA 的驅動,而 DirectML 的版本則尚未釋出。 ↩︎

  2. https://github.com/tensorflow/community/pull/243 ↩︎